Keeping an Organized Home During Renovation
Renovating your home can feel like stepping into a whirlwind of chaos. You might find yourself surrounded by dust, scattered tools, and furniture piled in corners. But fear not! With the right strategies, you can keep your home organized and make the renovation process much smoother. Think of your home as a ship navigating through turbulent waters; with proper organization and planning, you can steer it safely to calmer shores. In this article, we will explore effective strategies for maintaining order and organization during your renovation journey.
Proper planning is crucial to a successful renovation. Imagine trying to cook a complex meal without a recipe – it’s likely to end in disaster! Similarly, having a detailed timeline and checklist can keep your renovation on track. Start by mapping out your project phases. This might include things like demolition, construction, and decorating. Use a calendar to set clear deadlines for each phase. Additionally, consider creating a checklist that includes everything from hiring contractors to picking out paint colors. This way, you’ll have a clear vision of what needs to be done, and you can avoid feeling overwhelmed as the project progresses.
Before starting renovations, it’s essential to declutter your space. Think of it as clearing the deck before setting sail. A clean and organized area will not only make the renovation easier but also create a more pleasant working environment. Begin by going through each room and identifying items you no longer need. This can be a daunting task, but breaking it down into manageable steps can help. You might want to tackle one room at a time or set a timer for short decluttering sessions. Remember, the goal is to make space for the renovation while also reducing the stress of dealing with too much stuff.
Sorting belongings into categories helps streamline the decluttering process. You can create groups such as “Keep,” “Donate,” “Sell,” and “Trash.” This method allows you to make quick decisions about each item. For instance, if you come across a vase you no longer love, ask yourself if it brings you joy. If not, it might be time to let it go! By categorizing items, you’ll not only declutter your home but also simplify the packing process for your renovation.
Exploring donation and disposal options can help you responsibly manage unwanted items. Many local charities accept donations of furniture, clothing, and household goods. Not only does this help others in need, but it also keeps your items out of landfills. Additionally, consider recycling programs in your area for materials like electronics and appliances. Researching these options before you begin the decluttering process can save you time and effort later on.
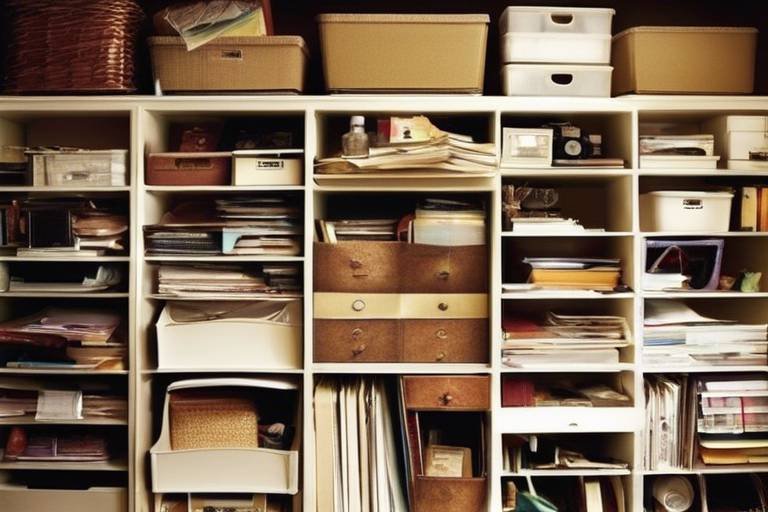
Finding effective storage solutions is essential during renovations. You want to keep your belongings safe and organized while the work is being done. Consider renting a storage unit or using a garage to store items temporarily. If that's not an option, try using clear bins to categorize and label items. This way, you can easily locate what you need without rummaging through boxes. Remember, keeping your belongings organized will save you time and frustration as your renovation progresses.
Establishing a designated area for renovation activities can minimize chaos. Think of this as creating a “workshop” within your home. Choose a space that is away from your daily living areas, if possible. Set up a table for tools, materials, and supplies. Ensure that this area is well-lit and easily accessible. By keeping renovation activities contained, you can maintain a sense of order in the rest of your home, making it easier to relax and unwind amidst the dust and noise.
Keeping your home clean during renovations can be a challenge, but it’s not impossible! Regular cleaning routines can help manage messes and keep your space looking tidy. Establish a daily or weekly cleaning schedule that fits seamlessly into your renovation timeline. For instance, you might choose to do a quick clean-up at the end of each day. This could include sweeping up dust, wiping down surfaces, and organizing tools. By staying on top of the mess, you’ll find it easier to focus on the exciting changes happening in your home.
Implementing regular cleaning routines can help manage messes. Create a checklist of cleaning tasks that need to be done regularly. This might include:
- Wiping down surfaces
- Sweeping or vacuuming floors
- Organizing tools and materials
- Taking out the trash
By making cleaning a part of your daily routine, you’ll keep the dust and debris from piling up, making your home feel more livable during the renovation.
Protecting your home’s surfaces and floors is vital during renovations. Dust and debris can wreak havoc on your furniture and flooring, so take proactive measures. Cover furniture with drop cloths or plastic sheeting to shield them from dust. Additionally, use floor protection products like cardboard or specialized floor coverings to prevent scratches and damage. These small steps can go a long way in maintaining the integrity of your home while the renovations are underway.
Q: How can I keep my kids and pets safe during renovations?
A: Create a designated safe zone away from the renovation area. Use gates or barriers to restrict access, and explain to your kids and pets why they need to stay away for their safety.
Q: What should I do if I find unexpected issues during the renovation?
A: Stay calm and assess the situation. Consult with your contractor or a professional to determine the best course of action. Sometimes, unexpected issues can lead to better improvements!
Q: How can I stay on budget during renovations?
A: Plan your budget carefully and stick to it. Keep track of expenses and make adjustments as needed. It’s also wise to set aside a contingency fund for unexpected costs.

Planning Ahead
When diving into the world of home renovations, the phrase “fail to plan, plan to fail” couldn't ring truer. Proper planning is the backbone of a successful renovation project. It’s like setting the stage for a grand performance; without a script, the show can quickly turn into chaos. So, how do you ensure your renovation goes off without a hitch? First, you need to create a detailed timeline that outlines every phase of the project. This timeline acts as your roadmap, guiding you from the initial planning stages all the way to the final touches. Make sure to include key milestones, deadlines, and even buffer days for those unexpected hiccups that tend to pop up.
Alongside your timeline, a comprehensive checklist is essential. Think of it as your renovation Bible, keeping you organized and ensuring nothing falls through the cracks. A well-structured checklist should include tasks such as obtaining permits, hiring contractors, and ordering materials. You might also want to break down the checklist by room or area, which can help you visualize the project and track progress more easily. Here’s a simple example of what your checklist could look like:
| Task | Status | Due Date |
|---|---|---|
| Obtain Building Permits | Not Started | MM/DD/YYYY |
| Hire Contractor | In Progress | MM/DD/YYYY |
| Order Materials | Completed | MM/DD/YYYY |
Additionally, it’s wise to set a realistic budget that accounts for both expected and unexpected expenses. Renovations can often go over budget due to unforeseen issues, so having a financial cushion can alleviate some of the stress. Break down your budget into categories, such as labor, materials, and permits, and keep track of your spending. This way, you can adjust your plans as needed without completely derailing your project.
Lastly, communication is key. If you’re working with contractors or a team, make sure everyone is on the same page. Regular check-ins can help ensure that the project stays on track and that any issues are dealt with promptly. By planning ahead and keeping everything organized, you’ll not only minimize disruption but also set yourself up for a smoother, more enjoyable renovation experience.

Decluttering Before Renovation
Before diving into a renovation project, it's essential to take a step back and assess your space. Think of decluttering as a spring cleaning on steroids; it’s not just about tidying up but about creating a blank canvas for your exciting new project. When you declutter, you're not only making room for renovations but also reducing stress and chaos during the process. Imagine trying to paint a masterpiece on a messy canvas—it's nearly impossible! By clearing out unnecessary items, you set the stage for a smoother renovation experience.
The first step in decluttering is to evaluate your belongings. Go through each room and ask yourself, “Do I really need this?” If the answer is no, it’s time to part ways. It can be helpful to have a few boxes handy—label them as “Keep,” “Donate,” and “Trash.” This way, you can easily categorize items as you go along. For example, items that you haven’t used in over a year might be prime candidates for donation or disposal. Remember, decluttering isn’t just about making space; it’s about making your home feel more like you.
Once you’ve sorted through your items, it’s time to think about how to handle the things you no longer want. This is where donation and disposal options come into play. Local charities often welcome gently used items, and many recycling programs exist to help you responsibly dispose of things that can’t be reused. It’s a win-win situation: you declutter your home while also helping those in need. Plus, it feels great to know that your unwanted items could bring joy to someone else.
As you prepare for your renovation, consider your storage solutions. You’ll likely need to keep some items close at hand, so think about temporary storage options. Renting a storage unit could be a viable solution, especially for larger pieces of furniture or boxes of belongings that you want to keep safe during the chaos of renovation. Alternatively, if you have a garage or shed, these can serve as great temporary storage spaces. Just remember to label everything clearly so you can find what you need without digging through piles of boxes.
In summary, decluttering before your renovation isn’t just a chore; it’s a necessary step to ensure a smoother, more organized process. By evaluating your belongings, responsibly managing unwanted items, and finding effective storage solutions, you’re setting yourself up for success. So roll up your sleeves, put on some upbeat music, and get ready to transform your space into something spectacular!

Sorting and Categorizing Items
When it comes to during a home renovation, think of it as a treasure hunt. You’re not just clearing out space; you’re uncovering hidden gems and rediscovering the things you love. The first step in this journey is to take a deep breath and approach the task with a clear mind. Start by gathering all your belongings in one central location. This might seem daunting, but it’s essential for getting a true picture of what you have.
As you begin sorting, consider creating categories that make sense for your lifestyle. For instance, you might have sections for keep, donate, sell, and throw away. This method not only makes the process more manageable but also allows you to see the volume of items you own. It’s like a mini-exhibition of your life! You can even use colored bins or labels to visually differentiate between these categories, which can make the process feel more organized and less overwhelming.
Here’s a simple way to categorize your items:
- Keep: Items that you use regularly or hold sentimental value.
- Donate: Good condition items that you no longer need but can benefit others.
- Sell: Valuable items that you can sell online or at a garage sale.
- Throw Away: Broken or unusable items that need to be disposed of.
Once you’ve sorted your items, take a moment to reflect on what you’ve decided to keep. This is a great opportunity to ask yourself questions like, “Do I really need this?” or “When was the last time I used this?” This self-reflection can help you make more informed decisions about what truly adds value to your life.
Don’t forget to involve family members in this process, as it can be a fun bonding activity. It’s a chance to share memories associated with certain items, which can make it easier to let go of things that no longer serve a purpose. Moreover, having everyone onboard ensures that you’re not just decluttering for the sake of it; you’re creating a space that reflects your family’s needs and desires.
Finally, once you’ve categorized everything, it’s time to deal with those piles. Schedule a time to drop off donations or set up a garage sale. It’s important to act quickly; otherwise, those items might find their way back into your home. Remember, the goal here is to create a more organized and functional space for your renovation project, so every item you can remove is a step closer to achieving that.

Donation and Disposal Options
When it comes to managing unwanted items during a renovation, donation and disposal options are your best friends. Not only do they help you clear out clutter, but they also allow you to give back to the community and ensure that your items are disposed of responsibly. Imagine the satisfaction of knowing that your old furniture or appliances could be a treasure for someone else! Before you toss everything into the trash, consider the various avenues available for donation and disposal.
First off, donation is a fantastic way to extend the life of your unwanted items. Many local charities, shelters, and thrift stores are often in need of gently used goods. For instance, organizations like Goodwill and Habitat for Humanity accept furniture, clothing, and household items. Not only does this help those in need, but it can also provide you with a tax deduction. Remember to check their guidelines on what they accept, as some items may not be suitable for donation.
On the other hand, if your items are damaged or no longer usable, it's essential to consider disposal options that are environmentally friendly. Many communities offer special pickup days for bulk items, while others have designated drop-off locations for recycling. For example, electronics should never just be thrown away; instead, look for e-waste recycling programs in your area. These programs ensure that hazardous materials are handled properly and that reusable parts are salvaged.
To make the process even smoother, here's a quick reference table to help you identify where to donate or dispose of your items:
| Item Type | Donation Options | Disposal Options |
|---|---|---|
| Furniture | Goodwill, Salvation Army, Habitat for Humanity | Bulk waste pickup, local landfill |
| Clothing | Local shelters, thrift stores | Textile recycling bins |
| Electronics | Best Buy, local e-waste programs | Special e-waste disposal events |
| Appliances | Habitat for Humanity ReStores | Manufacturer recycling programs |
By being mindful of your donation and disposal options, you not only keep your renovation space organized but also contribute positively to your community and the environment. So, as you prepare for your renovation, take a moment to think about how you can responsibly manage your unwanted items. It’s a win-win situation!

Storage Solutions During Renovation
When you're knee-deep in renovations, the last thing you want is to trip over your belongings or dig through boxes to find your favorite coffee mug. That's where effective storage solutions come into play. Having a well-thought-out plan for your items can not only keep your home organized but also reduce stress during this chaotic time. Think of it as creating a safety net for your belongings, ensuring they are protected and easily accessible when you need them.
One of the first steps is to consider temporary storage units. These can be a lifesaver, especially if you have a lot of furniture or belongings cluttering your space. Many companies offer affordable rental options, allowing you to store your items securely until your renovation is complete. Just imagine having an entire room freed up, allowing you to work more efficiently and keep your sanity intact!
If renting a storage unit isn't in the cards, you can also get creative with the space you already have. For instance, utilizing your garage or basement can provide a perfect place to stash away items. Just remember to label your boxes clearly. A simple system can save you hours of searching later. You might want to categorize boxes by room or type of item—this way, when you’re ready to unpack, you’ll know exactly where to find everything. You could even create a storage inventory to keep track of what’s in each box. Here’s a quick example:
| Box Number | Contents | Location |
|---|---|---|
| 1 | Kitchen Utensils | Garage |
| 2 | Living Room Decor | Basement |
| 3 | Bedroom Clothes | Spare Room |
Additionally, consider using furniture with built-in storage. Items like ottomans or coffee tables that offer hidden compartments can be a great way to keep your essentials close at hand while minimizing clutter. It's like having a secret stash that keeps your space looking neat and tidy.
Don't forget about vertical space! Utilizing shelves or wall-mounted organizers can free up valuable floor space. This method not only keeps your items organized but also makes your home feel more spacious. You can even create a small “command center” where you keep all your renovation supplies—think tools, paint, and other essentials. This way, everything is in one place, and you can easily grab what you need without rummaging through multiple boxes.
Finally, a little planning goes a long way. Before the renovation kicks off, take some time to assess what you’ll need during the process and what can be stored away. By prioritizing your items, you can ensure that you have easy access to the essentials while keeping the rest out of your way. With these storage solutions, you’ll find that maintaining order during your renovation is not just possible, but downright manageable!
Q: How long can I rent a temporary storage unit?
A: Most storage companies offer flexible rental terms, allowing you to rent a unit for as little as a month or as long as you need. It's best to check with local providers for specific options.
Q: What items should I store during renovations?
A: It's wise to store items that you won't need during the renovation, such as seasonal clothing, decorative items, and furniture that won't be used. Focus on keeping essential items accessible.
Q: Can I store food in a temporary storage unit?
A: No, it's not advisable to store food in a storage unit as it can attract pests and spoil. Keep all food items in your home, preferably in a designated area away from the renovation zone.

Creating a Renovation Zone
When it comes to renovations, chaos can quickly take over if you don't establish a dedicated space for all the action. Think of it as creating a command center for your project. A well-defined renovation zone not only helps in managing the mess but also keeps your sanity intact. Imagine trying to cook dinner in a kitchen that’s half torn apart; it’s a recipe for disaster! So, let’s dive into how you can set up this crucial area effectively.
First and foremost, choose a location that is convenient yet isolated from the rest of your living space. Ideally, this should be a room or area that is least used during the renovation. If you’re remodeling the kitchen, for instance, you might want to set up your renovation zone in the living room or a spare bedroom. This way, you can still navigate your home without tripping over tools or stepping on dust-covered floors.
Next, you’ll want to gather all the necessary tools and materials in your renovation zone. Create a tool station where you can easily access everything you need without rummaging through boxes or bags. Consider using a sturdy table or a large workbench to lay out your tools, paint, and other supplies. An organized workspace not only enhances efficiency but also minimizes the risk of losing important items in the chaos.
To further enhance your renovation zone, think about implementing a visual management system. This could be as simple as using colored bins or labeled boxes to categorize your supplies. For example, you might have one bin for painting supplies, another for electrical tools, and a third for plumbing materials. By visually organizing your items, you can quickly grab what you need without wasting precious time searching.
Additionally, ensure that your renovation zone is well-lit. Proper lighting is crucial for safety and productivity. If the area lacks natural light, consider adding portable work lights or even string lights to brighten the space. A well-lit environment not only helps you see what you’re doing but also keeps your spirits high during those long renovation days.
Finally, don't forget to establish some ground rules for your renovation zone. This might include keeping the area clean, ensuring tools are returned after use, and limiting access to only those involved in the project. By setting these guidelines, you can maintain a level of order that will make the renovation process smoother and more enjoyable.
In summary, creating a renovation zone is about more than just setting up a workspace; it’s about crafting an environment that fosters efficiency and organization. By taking the time to establish this area thoughtfully, you’ll not only streamline your renovation efforts but also reduce stress and chaos throughout your home.
- What should I include in my renovation zone?
Your renovation zone should include tools, materials, and a workspace. Organize items into labeled bins for easy access. - How can I keep my renovation zone clean?
Establish a cleaning routine and set rules for returning tools and materials to their designated places after use. - Is it necessary to have a separate renovation zone?
Yes, a separate renovation zone minimizes chaos and allows you to maintain some order in the rest of your home during renovations.

Maintaining Cleanliness
Keeping your home clean during renovations can feel like trying to keep your car clean while driving through a mud pit. The dust, debris, and chaos can quickly overwhelm even the most organized individuals. However, with a few practical strategies in place, you can maintain a semblance of order amidst the whirlwind of construction. Think of cleanliness during renovations as a protective shield for your sanity; it’s all about finding the right balance between progress and preservation.
First and foremost, implementing regular cleaning routines is essential. This doesn’t mean you have to stop everything and scrub the floors every hour; rather, it's about integrating cleaning into your daily tasks. For instance, setting aside just 15-30 minutes each day to tidy up can make a significant difference. You can create a simple cleaning schedule that aligns with your renovation timeline. Consider breaking it down into manageable tasks, such as:
- Wiping down surfaces at the end of each workday.
- Vacuuming or sweeping up dust and debris every few days.
- Using damp cloths to catch airborne dust particles.
By staying proactive, you can prevent dirt from accumulating and becoming an overwhelming problem. Just like watering a plant regularly keeps it healthy, consistent cleaning keeps your home from becoming a construction zone nightmare.
Another crucial aspect of maintaining cleanliness is protecting surfaces and floors. Think of your floors and countertops as the foundation of your home’s aesthetic; they deserve to be shielded from the inevitable wear and tear of renovation. Using protective coverings like drop cloths, plastic sheeting, or painter's tape can go a long way in preserving your surfaces. For example, placing a sturdy tarp over your floors can help catch dust and debris, making cleanup a breeze. Additionally, consider using:
| Protective Measure | Purpose |
|---|---|
| Drop Cloths | To cover furniture and floors from dust and paint. |
| Plastic Sheeting | To create barriers that contain dust in specific areas. |
| Painter's Tape | To protect edges and surfaces from paint splatters. |
By taking these precautions, you can minimize damage and maintain a clean environment, which is essential for both your peace of mind and the efficiency of the renovation process.
Finally, don't forget the importance of communication with your renovation team. Establishing clear expectations about cleanliness can help ensure that everyone is on the same page. You might even consider setting up a daily check-in to discuss cleanliness and organization. Keeping an open line of communication can help you tackle any messes before they become overwhelming, just like having a reliable co-pilot can make a road trip smoother.
In conclusion, maintaining cleanliness during renovations is not just about keeping your home tidy; it’s about creating a comfortable environment that allows you to thrive amidst the chaos. With regular cleaning routines, protective measures, and effective communication, you can navigate the renovation process with minimal disruption and stress. So roll up your sleeves, put on your favorite playlist, and tackle that mess like a pro!
Q: How often should I clean during renovations?
A: It's advisable to set aside 15-30 minutes each day for cleaning, focusing on high-traffic areas and surfaces that accumulate dust.
Q: What are the best materials to protect my floors?
A: Using drop cloths, plastic sheeting, and painter's tape can effectively protect your floors and surfaces from dust and damage.
Q: Should I hire a cleaning service during renovations?
A: If your budget allows, hiring a cleaning service can help alleviate some of the stress, but implementing a regular cleaning routine can also be effective.

Regular Cleaning Routines
When you're knee-deep in renovations, it's easy to let cleanliness slide. After all, who has time to tidy up when you're busy choosing paint colors or ripping up old flooring? However, establishing can be a game-changer in maintaining some semblance of order in your home. Think of it as the secret sauce that keeps your renovation chaos from spilling over into the rest of your life. Just like a chef wouldn't let a messy kitchen ruin their culinary masterpiece, you shouldn't let dust and debris take over your living space.
So, how do you create a cleaning routine that works seamlessly with your renovation schedule? First, consider breaking it down into manageable chunks. Instead of trying to tackle a massive cleaning session at the end of each day, opt for smaller, more frequent clean-ups. For instance, designate a few minutes each morning or evening to sweep up the dust and debris that accumulate during the day. A quick vacuum can do wonders to keep the mess at bay.
Here’s a simple cleaning schedule you might find helpful during your renovation:
| Day | Cleaning Task |
|---|---|
| Monday | Dust surfaces and wipe down counters |
| Tuesday | Vacuum high-traffic areas |
| Wednesday | Clean windows and mirrors |
| Thursday | Organize tools and materials |
| Friday | Deep clean one room (rotate each week) |
| Saturday | Take out trash and recycling |
| Sunday | Rest and recharge for the week ahead! |
In addition to this schedule, consider involving everyone in the household. Assigning specific tasks to family members not only lightens your load but also fosters a sense of teamwork. Plus, it can be a fun way to bond amidst the renovation chaos. Maybe turn on some music and make it a mini cleaning party! Who said cleaning has to be dull?
Another crucial aspect of maintaining cleanliness is protecting your surfaces and floors. As renovations progress, your home will likely see its fair share of dust, paint splatters, and other messes. To combat this, invest in some quality drop cloths and protective coverings for your floors. Not only will this save you time in the long run, but it will also help keep your home looking as good as new. Think of your floors as the foundation of your home’s aesthetic; you wouldn’t want to let them suffer under the weight of renovation debris!
Finally, remember that a clean environment can significantly boost your mood and productivity. When your space is organized and tidy, it’s easier to focus on the exciting aspects of your renovation project rather than getting bogged down by the mess. So, embrace the cleaning routine, and watch as it transforms your renovation experience from chaotic to manageable!
- How often should I clean during renovations? Aim for daily clean-ups to keep dust and debris manageable.
- What are the best tools for cleaning during renovations? A good vacuum, microfiber cloths, and protective coverings are essential.
- Can I involve my kids in the cleaning process? Absolutely! Assign age-appropriate tasks to make it a fun family activity.

Protecting Surfaces and Floors
When you're diving into a renovation project, the excitement can sometimes overshadow the importance of protecting your home’s surfaces and floors. After all, the last thing you want is to finish your beautiful new kitchen only to find scratches, dents, or stains from the chaos that ensued during the process. Think of your home as a canvas; you wouldn't want to splatter paint all over it before the masterpiece is complete, right? So, how can you ensure that your surfaces and floors remain unscathed while the renovation hustle and bustle is in full swing?
First and foremost, investing in quality protective coverings is essential. Whether it’s a thick plastic sheeting, drop cloths, or specialized floor protection film, these materials act as a shield against dust, spills, and accidental impacts. For hardwood floors, consider using a combination of cardboard and painter’s tape to create a sturdy barrier. This not only covers the surface but also prevents slipping, which can be a hazard when there’s a lot of foot traffic.
Additionally, it's wise to establish a designated pathway for workers and materials. By clearly marking a route for moving equipment and supplies, you minimize the risk of damage to your floors. You can use colored tape or cones to guide the way. This simple step is akin to creating a no-fly zone; it keeps the chaos contained and protects your home from unnecessary wear and tear.
Don’t forget about your walls and countertops! During renovations, these surfaces can easily fall victim to bumps and scrapes. Using painter's tape along edges and corners can help protect against accidental marks. Moreover, covering countertops with old blankets or towels can serve as a cushion against heavy tools or materials that might otherwise cause scratches. It's like wrapping your valuables in bubble wrap before shipping them off; it’s all about ensuring they arrive in mint condition.
Another effective strategy is to implement a clean-as-you-go approach. This means regularly cleaning up dust and debris, which can accumulate quickly and lead to bigger messes. Not only does this keep your work area tidy, but it also prevents dirt from getting ground into surfaces, which can cause lasting damage. Consider setting aside a few minutes at the end of each day to sweep up and wipe down surfaces. It’s a small effort that pays off in the long run.
In conclusion, protecting your surfaces and floors during a renovation is not just about preventing damage; it’s about maintaining the integrity of your home. By taking proactive measures such as using protective coverings, establishing pathways, and implementing a cleaning routine, you can ensure that your living space remains unscathed while you create the home of your dreams. Remember, a little foresight goes a long way, and your future self will thank you for the effort you put in today.
- What materials are best for protecting floors during renovations?
Thick plastic sheeting, drop cloths, and specialized floor protection film are excellent choices. For hardwood floors, consider using cardboard and painter’s tape.
- How can I clean up dust and debris effectively?
Implement a clean-as-you-go approach by setting aside a few minutes at the end of each day to sweep up and wipe down surfaces.
- Should I cover my walls during renovations?
Yes, using painter's tape along edges and corners can help protect your walls from accidental marks and scrapes.
Frequently Asked Questions
- How can I effectively plan for a home renovation?
Planning is key! Start by creating a detailed timeline and checklist to map out each phase of your renovation. This will help you stay organized and ensure that everything runs smoothly. Think of it as your renovation roadmap—without it, you might find yourself lost in a sea of chaos!
- What should I do before starting the renovation?
Decluttering your space is a game changer! Before you dive into renovations, take the time to sort through your belongings. Remove unnecessary items to create a clean slate. It’s like clearing out your closet—you’ll feel lighter and more focused!
- How do I sort and categorize my belongings?
Start by grouping items into categories like 'keep,' 'donate,' and 'dispose.' This makes it easier to manage your stuff during renovations. You can even use clear bins to label and organize everything. It’s like putting together a puzzle; once you have the pieces sorted, the picture becomes clearer!
- What are some good donation and disposal options?
Look for local charities or recycling programs that accept household items. Donating is a great way to give your unwanted items a new home while helping others. Plus, it’s environmentally friendly! Think of it as a win-win situation!
- How can I store my belongings during renovations?
Consider temporary storage solutions like renting a storage unit or using a garage. You can also use your friends’ or neighbors’ spaces if they’re willing. Just like packing for a trip, you want to keep your essentials accessible while everything else is safely tucked away!
- What is a renovation zone, and why do I need one?
A renovation zone is a designated area where all the work happens. Setting this up minimizes chaos and keeps the rest of your home organized. It’s like having a dedicated workspace—everything you need is in one place, making the process smoother and less stressful!
- How can I maintain cleanliness during renovations?
Implement a regular cleaning routine to manage dust and debris. Set aside time each day to tidy up the renovation area. Think of it as a daily reset button; a little effort goes a long way in keeping your home livable!
- What measures should I take to protect my surfaces and floors?
Use drop cloths, plastic sheeting, or old blankets to cover surfaces and floors. This will prevent scratches and damage during the renovation. It’s like putting on a protective shield; you want to keep your home safe from any harm!